Make Stuff Like This!
Here isnhow i went from not knowing how to weaving to making sweet personable initials on all my clothing like a pro, follow my tips below!
Step #1
Step 1: Preparing the Loom and Threading the Warp
Before weaving any pattern, preparation is essential. Begin by setting up the loom, ensuring the warp strings are properly threaded. The warp threads run vertically on the loom and serve as the foundational structure of the fabric. Carefully measure and align the threads, as uneven tension can lead to distorted patterns. In overshot weaving, the pattern emerges from the interaction between the warp threads and the weft threads (which run horizontally). Use a threading guide if available and double-check that the pattern will allow the formation of the initials “KD.” The process resembles the snowflake pattern setup but will follow the structure of the letters instead. Take time to ensure the loom’s huddles are positioned correctly, as mistakes here can complicate the later steps.
Step #2
Step 2: Starting the Base Weave with Tabby Rows
Once the loom is ready, the next step involves creating a solid base. Overshot weaving, like the snowflake pattern, requires alternating rows of plain weave (known as tabby) and pattern weave. The base weave provides structural integrity for the initials to appear clearly. Start by passing the shuttle carrying the weft thread over and under the warp threads in an alternating pattern. Use a contrasting color for the tabby weave to enhance the visibility of the “KD” letters later. For instance, a light background with dark pattern threads works well. As you weave, keep the weft tension even, ensuring the base remains flat and consistent. This stage lays the groundwork for the design to stand out crisply.
Step #3
Step 3: Introducing the Contrasting Thread for Letter Formation
With the base weave complete, it’s time to introduce the pattern threads to create the initials. Choose a distinct color to contrast with the base; this will make the letters more visible. Overshot weaving involves passing the pattern thread over one warp string and then under the next in a specific sequence. To form the letter “K,” position the weft to create diagonal lines intersecting near the center. The “D” requires a combination of straight lines and curves, achieved by manipulating the warp-thread passes. Use the snowflake pattern’s alternating technique as a guide, but adjust the thread placement to match the letter shapes. Patience here is crucial, as even small mistakes can distort the letters.
Step #4
Step 4: Weaving the Letters with Clear, Bold Lines
The next step is to continue weaving while emphasizing the letter shapes. As you follow the pattern you’ve established, pay close attention to the symmetry and spacing. Overshot weaving naturally creates patterns by altering the tension and sequence of the weft threads. To make the “K” and “D” appear crisp, ensure the contrasting thread consistently follows the designed pattern. Use pattern blocks similar to the snowflake approach to maintain consistent spacing. Maintain proper tension in both the pattern and tabby threads; uneven tension can cause the letters to warp or blur. As the letters take shape, regularly check the back of the fabric to confirm their clarity.
Step #5
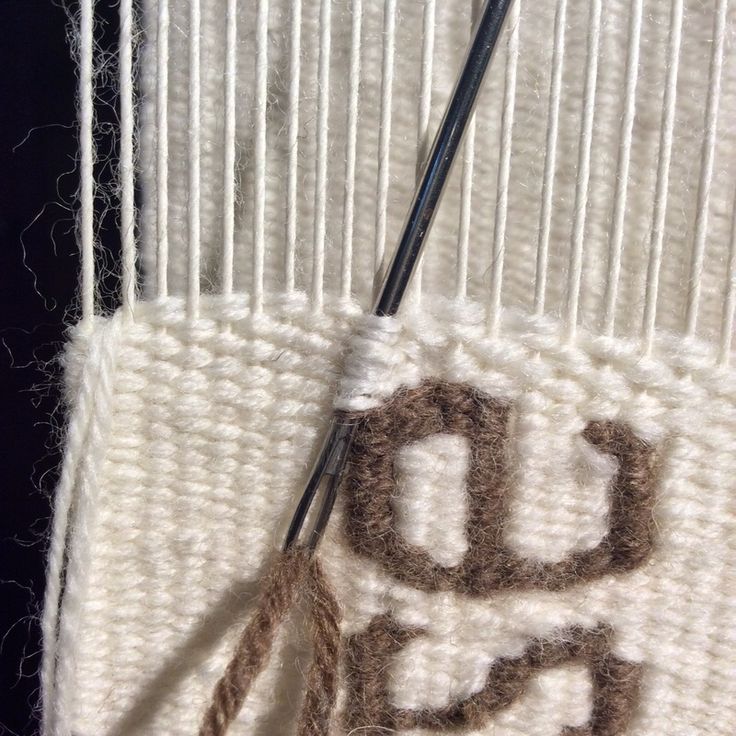
Step 5: Finishing the Weave and Inspecting the Pattern
Once the initials “KD” are complete, it’s time to finish the weave and secure the fabric. Weave a few additional rows of plain tabby at the top to stabilize the initials. Then, carefully remove the cloth from the loom, ensuring you don’t disturb the weave structure. Inspect the letters for clarity, ensuring the contrasting threads are properly aligned. If necessary, use a tapestry needle to make minor adjustments. Overshot weaving, like the snowflake pattern, relies on precision and patience. Once satisfied with the result, finish the edges to prevent unraveling. Display the woven cloth proudly, showcasing the art of overshot weaving combined with personalized initials.